Showing posts with label games. Show all posts

Thursday, August 8, 2019

3 (plus) Ways to Use Binder Clips

I love shopping in the teacher stores (both online and brick-and-mortar). I always find lots of resources I'd love to have. However, my budget does not allow me to buy all (or even most) of the things I see. 

Also, because of cost and storage, I need things that multi-task. I like those specialty educational resources but many times I'm limited in how I can use them. A great item that is inexpensive and can be used in lots of ways is the binder clip. Here are three ways we have used binder clips in our room.


Game Pieces - Use binder clips to make stand-up game pieces. This one uses a picture card. But you could use anything that could clip in the binder clip. Use photographs of your kids. Use index cards on which kids have printed their names or drawn pictures. Use letters or shapes from bulletin board sets. You can use anything. Clip it in the binder clip and stand on the table or gameboard. 

Or stick a colored sticker on the binder clip or buy a set of colored binder clips and use the clips themselves for game pieces.

Additional task: Use these stand-up cards for graphing. Ask a question or display items for kids to choose. They can place their clip (with picture, name, or whatever) under their choice.


Book Binding - Use binder clips to attach pages together in a homemade book. Kids could draw pictures and/or write words on sheets of paper or cards. Clip the pages together and turn the pages. 

This book is made from food labels. Cut labels from boxes or cans and tape the labels onto index cards. Clip the cards together. (Use logos that are familiar to kids. They can "read" this book because it uses environmental print, print they recognize.)

Additional perk: These books are easily changed. When kids master the environmental print words or when your emphasis changes, file these cards and bind new ones for a new book.


Homemade Clipboard - Use a piece of cardboard and a binder clip to make a homemade clipboard. Stack paper and align with the cardboard. Clip on the binder clip. Kids now have a portable "desk" to write or draw. I like this because I can change the orientation of the clip. I can move it to the side and use the paper in a horizontal format instead of always using vertical or fighting the clip on the side (like on a clipboard). 

Additional perk: If space is tight, use these to reduce the number of tables in your room. Kids can sit on the floor and work in small groups as needed.


One of my favorite places to find items to repurpose is the office supply store (or the office supply section of your favorite discount store). Head to your favorite office supply spot and stock up on binder clips. Here are a few other quick ideas:
  • Use the binder clips as counters or other manipulatives. 
  • Add the clips to an activity that allows kids to practice pinching to open the clips, such as clipping onto the sides of a box. (Great for fine motor development) 
  • Hang the clips on pushpins to make easily changeable wall displays. 
  • Or just clip papers together, as the binder clips were designed to do. (Maybe office dramatic play!)


Thursday, April 6, 2017

5 Ways to Use Straws


Straws are a great resource to have on hand in your preschool or kindergarten classroom. Here are five ways we've used them in our classroom.

1. Build with them.

Or at least use them in your blocks center. We've explored all kinds of things in the blocks center and straws make interesting additions to block creations or other construction play.


2. Paint with them.

We painted on a canvas with straws and balls. The idea was to blow the practice golf balls around on the canvas. The paint was too thick or the balls too solid so blowing was a chore. Instead we batted the balls around on the canvas using the straws as bats or paddles.


You can also put paint on the paper and blow the paint to create designs. Check out the "wind art" on this post on Pre-K Pages.


3. Play games with them.

Recently we tried some challenge games. We used straws to blow cups across (and off) a table. We used straws to pick up and move tissue paper squares; suck in to attract the paper to the straw, move it, and release onto the target.


Another game to play is blowing a pom-pom along a trail. Use tape to make a trail line. Place a pom-pom on the tape and blow the pom-pom down the trail.


4. String them.

Cut the straws into short lengths. String them on a chenille craft stem to make a bracelet or on a length of yarn to make a necklace.

Add some number practice with this activity. Roll a numbered cube. Add straw pieces or other things to the bracelet or necklace.


Note: Straws could also be a part of cutting practice. Place them (and paper and other items) on a table with scissors for kids to cut and cut and cut.


5. Fly them.

The kids created a tossing/flying game with the straws and cups. They arranged the cups in a group and tossed the straws like darts or spears, trying to land them in a designated cup.


Or make a straw airplane with paper strips, tape, and straws.


Straws are a part of our regular resource collection. What have you done with straws in your classroom?

Monday, April 3, 2017

"Walk Upside Down"


I love that my kids are inventive and have great creative ideas. I'm often surprised by just how interesting and expansive their thinking can be.

We were playing a moving game in the classroom a while back. I set up two tape lines to move between. (This group needs some suggested boundaries!)


We used a large inflatable cube with pockets. (Do you have one of these? They are great for all kinds of games. You can get one here. This link is just for information; I get nothing if you buy one.)


Anyway...I digressed there for a minute. We wrote different ways to move back and forth between the lines. The kids tossed the cube and then moved from one line to the other in the way they rolled.


I put "regular" types of movements--giant steps, tiny steps, crab walk, marching, and so forth.


After a while, I said, "Would you like to change what's in the cube?" Of course, they did. I asked them to suggest things to put in the cube. Their suggestions were much more inventive than I ever thought: Walk upside down, walk like a fish, bounce like a ball, slow motion.


Did we use those? You bet. Did they roll those odd things? You bet. Did they move in the suggested ways. They certainly tried.


Sometimes I'm quick to be in charge and direct things. Or I ask for suggestions and then dismiss them as impractical or whatever. But listening to the children can be great for creativity and for fun.


And when a child rolls something like "bounce like a ball," his interpretation may be completely different than yours. But certainly interesting to watch!

Friday, March 24, 2017

Take on Some Challenge Games


This particular group of kids in my church class like new things. They are always interested when I bring in something new or different. It doesn't need to be something completely novel, just something new for them or something used in a new and different way.

Recently our curriculum suggested some challenge games for our group. I figured we would try them out. Materials were ordinary materials--paper plates, plastic cups, straws, tissue paper squares. These were the suggested challenges/games:

  • Build a cup pyramid with the cups.
  • Build a tower with the cups and plates.
  • Blow cups across (and off) the table using straws.
  • Move tissue paper squares from one plate to another using a straw.
The curriculum suggested using a timer and challenging kids to do tasks in one minute (or other designated time). We didn't use a timer and just let the kids explore.

They did build towers and variations on pyramids.


They blew the cups across the table. One boy figured that two straws would be better than one.


But he learned that one kept the air more focused.

He did move the paper with a straw. 


And then with multiple straws.


It was interesting to see the children explore and experiment. After trying the suggested challenges, the children began to create their own challenges and games. (See the straw tossing game post.)


I think that children are looking for challenges, things that cause them to think and to try new things. Gather some familiar items and create games or challenge your children to create games. If your children are older or want more challenge, add in a timer. But I'll bet more of your kids will enjoy just playing and creating new games.


Maybe the group I have now is different. Every time we play a game they seem to want to invent new rules or new ways to play. But I remember what both David Elkind and Peter Gray said about games. Games are a way that children begin to understand rules; they begin to understand how to function in society, in a community. 

Your challenge games can help preschoolers develop skills to be good citizens later in life. 

Not bad for a few straws, cups, and plates.

Friday, March 17, 2017

The Joy of Ordinary Stuff


It's easy to get caught up in the unusual or the coolest new gadgets. I know in early childhood, we are often looking for a new idea or activity or resource. We want to have fun new experiences for the kids to do. We want the tools that will help us as teachers or the kids as learners.

But sometimes the ordinary stuff brings as much joy as any cutting edge item.

Recently I set up a center for challenge games. Fun games or challenges that could be done with paper plates, straws, plastic cups, and tissue paper squares. (All of these things were readily available and already on hand.) I had a page with some game ideas. (I'll write about those later.) But things didn't just stay with the suggested challenges.


After playing and experimenting for a while, a boy wanted to set up the cups "like bowling." He set the cups in a triangle arrangement. I think his plan was to use a paper plate as a bowling ball, sliding it to knock over the cups.

I said, "I wonder if I can get this straw in a cup." I tossed the straw like a dart.


And my kids were hooked. They tried to toss the straw into cups like I did. I figured that they would try it and move onto other ideas - like before.

But they really got into this particular activity. After tossing for a few turns, the boy said, "Now we're trying to get it into this one." He pointed to the closest cup. They took turns tossing until someone landed a straw into that cup.


"Now this one," someone said, pointing to another one. And the tossing began again.

They played with this game for quite a while...longer than many other things they do regularly in the classroom. The challenge was difficult enough that they had to try several times. But rewarding enough that they didn't get frustrated or tire of trying.

One of my quietest girls, the one that will draw alone or watch others play, really got into the game. She interacted with the boy, tried again and again to land a straw in a cup (succeeding as much as the others), and talked more than I've ever seen/heard.


A few things that I observed--

  • Truly engaging activities do not require fancy equipment or elaborate plans. Plastic cups and straws...simple tossing into a target...many minutes of engagement.
  • Often the best ideas are a collaboration between children and adult. The idea to arrange the cups was theirs. The tossing of the straw was mine. The resulting game of specific targets was theirs. Give and take between adult and child is important for learning and exploration.
  • Flexibility is important. The resulting game was not planned (by them or me). Being open to using materials in a different, unplanned way encourages the most learning and play.
  • Think about what they like and provide ways for them to do it. My boys like to be a little rowdy. They like different. (And who doesn't like throwing stuff?)
  • Accept their choices. I offered the idea of tossing the straws. But I was ready to move to something else if they weren't interested. "I wonder...." can be a great phrase that encourages exploration and yet doesn't impose ideas.
Mostly I was fascinated that cups and straws could be so interesting for such a long time. 

Maybe the most interesting things for play are just sitting in the closet, waiting to meet the imaginations and creativity of boys and girls. 

Saturday, November 5, 2016

5 Ways to Use Pompoms


Pompoms are standard tools in an early childhood classroom. While you can use them for art in lots of different ways, you can use them for other learning, too. Here are five ways to use pompoms (other than gluing them on paper).


1. Build those fine motor skills.
Working the small muscles of the hand is an important early childhood skill. Pinching and manipulating items helps build skills that will be used in writing (and other important life skills).

Use chopsticks to move pompoms - Or use tongs or clothespins or or tweezers or just index finger and thumb.

Transfer them into an ice cube tray. (Pre-K Pages)

Or scoop and pour them - for those younger or less developed muscles. (Buggy and Buddy)


2. Use air to move them.

You can do this with a squeeze bottle. (Mom Inspired Life)

Or blow them with a straw. (Lemon Lime Adventures)


3. Use them in water play.

Drop pompoms in your water bin. (Fantastic Fun and Learning)
Squeezing the water from the pompoms is great fine motor play, too!


4. Stick them on Velcro.

Stick a strip of Velcro to the wall or on a stand-up. Stick the pompoms on. (Teach Me Mommy)
Make patterns, count them, or just play with them on Velcro.
For older kids, create Velcro in shapes or letters or numbers. Stick on the pompoms!


5. Play number and counting games.

Roll the cube and fill numbered bags. (Pre-K Pages)

Or count them in a game. (Learning 4 Kids)


For lots more great ideas (including magnetic pompoms!), check out this post/video on Pre-K Pages.


How do you use pompoms in your classroom?

Monday, May 16, 2016

Games and Social Skills

from The Power of Play

Playing games helps children develop social skills and begin to learn how to function within the boundaries of a particular situation.

Wednesday, May 11, 2016

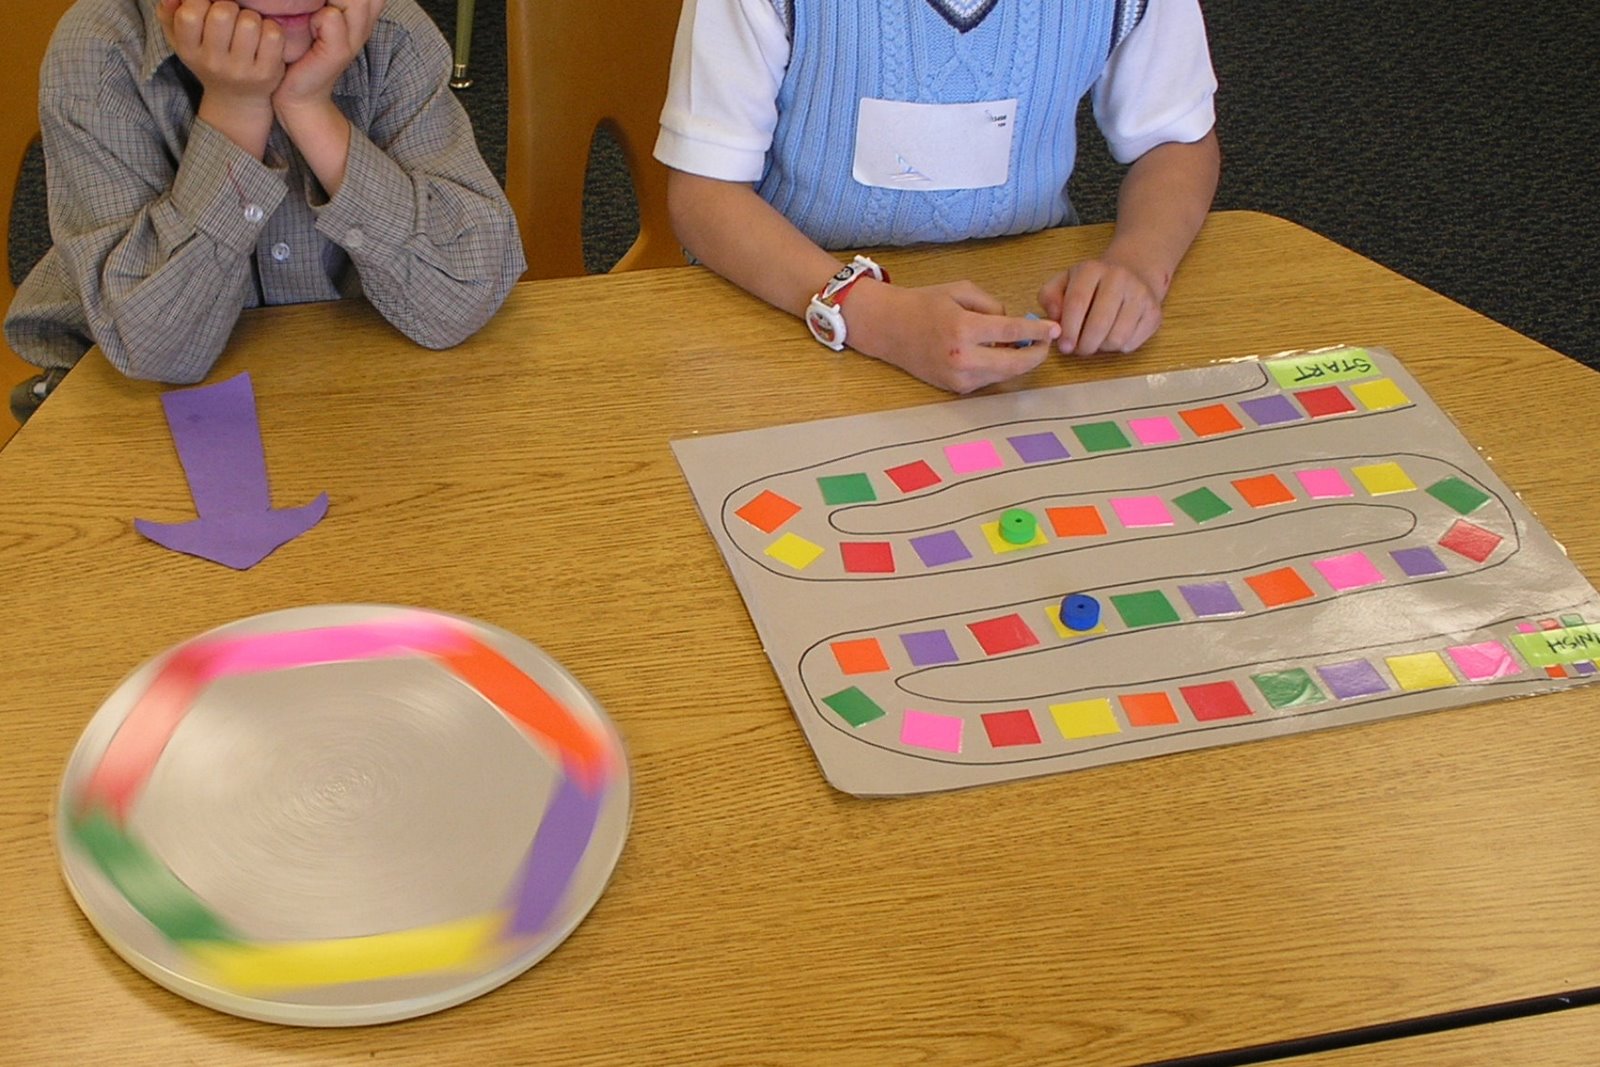
Board Game DIY

Do your kids like games? Mine do. Every year my kids love to play games at a table. I've found that they like me to play, too. Here are some games we have made. Use these ideas to springboard off and make your own games for kids.

Trail Game


This game is a favorite. We've used it for many years. I used paper scraps to make spaces for the trail. When I first made the gameboard, I didn't include lines along the sides of the colored trail; that caused confusion. For the spinner, I taped paper strips to a paper circle and taped all of that to a lazy susan. Place an arrow beside it and spin away. (They love the spinner!) For game pieces, we use foam beads. But we've used game markers from old games, small Lego bricks, and buttons as game pieces, too. (For more details about this game, see this post.)


Trail Game #2


I made this adaptable board game using a file folder and stickers. Create the trail across the folder. Create cards for moving through the trail with stickers and index cards. This game now resembles Candyland. Use binder clips for game pieces. Easy and fun to play. Add words, letters, numbers, or quantities of dots to your cards to add more learning opportunities. (For more details and ideas see this post on Pre-K and K Sharing and this post on Brick by Brick.)


Large Trail Game


I used the Giant Game Floor Mat to make a large trail game. I printed arrows and words on paper and slid into the mat. We used a purchased spinner and lids covered with colored tape. This game is fun because it's super-sized. You could also make a homemade game mat by taping large freezer ziplock bags to a tablecloth or drop cloth. (See this post for more details about the game and markers.)


Counting Game


I made this counting game recently for us to play. I made a trail of stickers around the outside of a folder. On some of the stickers, I drew a square. I made a "river" in the middle of the folder. Kids would roll a numbered cube and move around the trail. (We used old game markers.) When landing on a square, kids rolled a cube and counted that many marbles to put in the river. This was a lot of fun. (See this post on Pre-K Pages for more details and variations.)


Race Game


Cindy made this game. We've played other games like it in our class and the kids love it. In this game, the bears (or markers) are competing, not the children. Draw a grid on a piece of heavy paper. Use stickers to mark each color "lane." (You could also color the spaces with a marker.) Make a cube with matching colors on the sides. (Use a boutique tissue box as a homemade cube.) Kids take turns rolling the cube. Whatever color is on top of the cube indicates which bear moves one space. Continue playing until one (or all) of the bears reach the finish line.

What games have you made? I'm always on the lookout for more!

Wednesday, January 6, 2016

5 Ways to Use Craft Sticks

5 ways (Brick by Brick)

Craft stick are one of our favorite things. We use them in all kinds of ways. Here are five ways we've used them (plus a few other links, too).

1. Build with them

We like to include craft sticks (and other wood pieces) with our blocks from time to time. The craft sticks add another way to create create structures.

blocks and craft sticks (Brick by Brick)


Plus sticks can make great roads. (See my post about craft stick roads on PreK and K Sharing.)


craft stick roads (Brick by Brick)


2. Magnet Sticks

Add magnets to the backs of craft sticks and you have magnet sticks! These are great for exploring alone or with other magnetic shapes on a magnet board.

Magnet sticks (Brick by Brick)


Magnet Sticks (Brick by Brick)

Check out the post on Teach Preschool that inspired my sticks. Deborah made shapes, too.
DIY Magnetic Craft Sticks (Teach Preschool)


3. Stick Puppets

Tape photos or pictures from magazines onto craft sticks to make stick puppets.
Or provide paper, scissors, markers, and tape for kids to make their own stick puppets.

Stick puppets (Brick by Brick)

Mix It Up (Brick by Brick)


4. Make games.

We use craft sticks for different kinds of games. For one game, I printed letters on the sticks to spell a word. I made several sets of letters. We put them in a container and spilled them on the table. Then we played a variation of "Pick Up Sticks" where kids tried to remove a stick without moving any other stick. Kids tried to spell the name/word as we played. 

Our kids created other games with this group of sticks, too.

pick up sticks game (Brick by Brick)

Invention (Brick by Brick)

Check out this game made with sticks: Making Shapes (education.com)


5. Hot Glue Sculptures

Our favorite Christmas activity is making frames. We use the glue guns to make frames with colored craft sticks. (And we get to use the glue gun!) Using the glue gun makes the assembly quick (and usually painless); we don't need to wait for craft glue to dry before continuing our work.

Of course, you can use other glue instead of hot glue to make sculptures. Any way you do them, this is a fun way to explore!

craft stick frames (Brick by Brick)

"I'm Not Allowed to Use That" (Brick by Brick)

Check out this hanging sculpture from Childhood 101.


These are just five ways we use craft sticks. How do you use them in your classroom?